Flood-Proof Your Indoor Hydroponic Farm: RPZ Backflow, Floor Drains, Secondary Containment, Leak Sensors & Sump Redundancy (2026 Guide)
Common mistakes: treating water as harmless
“If I can monitor it, I can control it.” That belief quietly destroys more indoor hydroponic rooms than pests, nutrient issues, and bad seeds combined.
Sensors are great. But sensors alone do nothing to stop a 200 L reservoir from emptying onto a concrete slab, or a municipal pressure drop from pushing sewage back through your plumbing and into your grow.
In the last few years, we have seen three big warning shots:
- Climate-resilient homes are now being built with flood-resistant detailing, backflow protection, and self-sufficiency features, as shown in this climate-proof home upgrade guide.
- In Indore, India, multiple deaths were linked to suspected sewage contamination of the drinking water network, a grim reminder of what happens when dirty and clean water mix in the wrong place, at the wrong time, as reported in this investigation.
- Outdoor farms are already being reshaped by extreme storms, like the producer featured in this article who had to pivot after fields were wrecked by weather.
Indoor hydroponic farms are not immune. In fact, they concentrate water, nutrients, power, and infrastructure in one tight room. When something fails, the damage is fast and expensive.
This guide is about physical controls: RPZ backflow preventers, floor drains with backwater valves, secondary containment sized to real volumes, dual sump redundancy, and leak sensors that actually shut things off. You will end up with a room that can take a hit from storms, plumbing faults, or human error and keep your Kratky tubs, DWC systems, or NFT lines from becoming a disaster zone.
Why these mistakes happen: false sense of security and bad assumptions
Most indoor growers do not come from plumbing or industrial controls. We stack systems based on space and yield, then bolt on safety later. A few wrong assumptions drive nearly all flood and backflow disasters.
Mistake 1: Thinking “indoor” means “safe from climate risk”
Storms do not have to hit your building directly to cause trouble. Heavy rain can overload municipal sewers and stormwater, raising the risk of backflow into low-lying buildings. Pressure drops in the water grid can turn your nutrient line into a siphon back toward the street main.
Events like the Indore contamination case are extreme, but they show the chain: overloaded sewers, compromised lines, dirty water where clean water is supposed to be. Indoor farms tied directly into potable lines are part of that system whether we like it or not.
Mistake 2: Treating hydro plumbing like garden hose work
Many hydro rooms start as “DIY plus upgrades” projects: a hose from the sink, a float valve on a top-off barrel, a couple of bulkheads, and some vinyl tubing. That mindset ignores that you are dealing with:
- High-hazard fluids (nutrients, biofilms, root slime, possibly pathogens).
- Elevated tanks above sensitive spaces (neighbors, electrical rooms, basements).
- Potential back-siphon into potable lines.
Most plumbing codes treat fertilizer injection and chemical feed as high hazard and expect reduced pressure principle backflow assemblies (RPZs) and air gaps. If you would not drink from your reservoir, assume the code does not want it anywhere near unprotected potable lines.
Mistake 3: Relying on monitoring without physical fail-safes
Smart plugs, Wi-Fi leak sensors, and cloud dashboards feel like control. But if you have:
- No normally-closed valve on your make-up water line.
- No secondary containment pan under your main DWC array.
- No backwater valve on a floor drain tied into an old combined sewer.
Then you are accepting that a single valve failure, float failure, or sewer surge might ruin your room before your phone even buzzes.
Mistake 4: Underestimating the volume at risk
Growers often size containment by “typical spill”, not worst-case. That is how 500 L of nutrient ends up on a floor “designed” to handle 50 L. Every room should be designed around the largest single volume that can move without someone opening a valve.

How to fix them: build a flood-proof hydro design
Now we turn the screws. The goal is simple: a single failure cannot flood your building, cannot contaminate potable water, and cannot silently kill your crop. This section gives you a practical design you can hand to your plumber or builder.
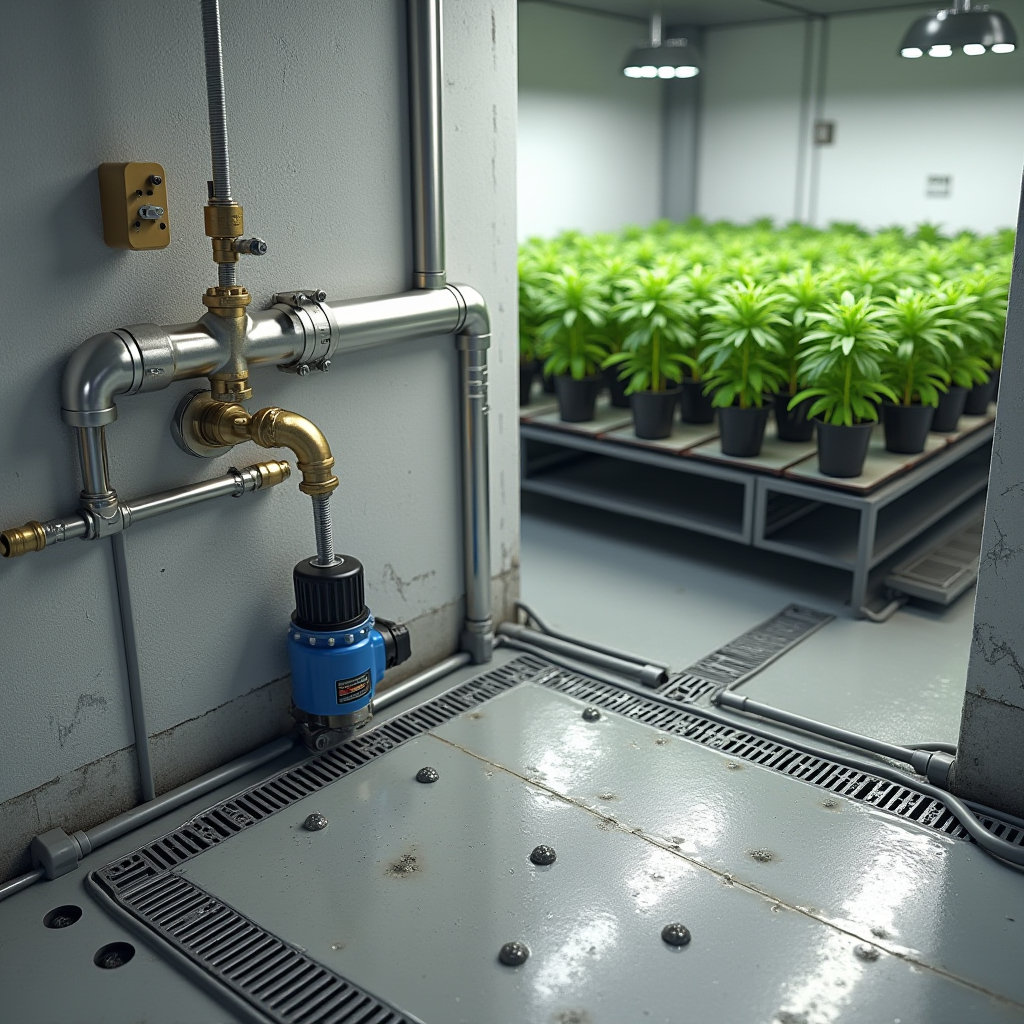
1. RPZ backflow and air gaps: keep nutrients out of potable water
1.1 What you need
- Dedicated hydro branch: A cold-water line that feeds only your hydroponic system.
- RPZ backflow preventer: A reduced pressure principle assembly rated for high-hazard use, installed where it can be tested and where its relief port can drain safely.
- Air gap into your system: The outlet from the RPZ should discharge into an air-gapped funnel, floor sink, or tank inlet above the maximum water line, not directly into a submerged pipe.
- Downstream shutoff and union: A full-port ball valve and union after the RPZ for maintenance.
1.2 Placement and diagram in words
Imagine your water path as a straight line:
- Building supply pipe.
- Shutoff valve for the hydro branch.
- RPZ assembly in a service nook, mounted above floor level.
- RPZ relief port piped into a small funnel or floor sink with an air gap.
- Downstream ball valve and union.
- Pipe to your mixing tank, with the outlet terminating above the tank as a free-falling stream.
If the city pressure drops or reverses, the RPZ vents instead of letting water flow backward. If the RPZ fails, it dumps safely to a drain, not into your grow room.
1.3 Testing interval
- Plan on annual RPZ testing by a certified tester, or whatever interval your local code requires.
- Log installation date, test dates, and any repairs in a simple spreadsheet or clipboard log.
2. Floor slope, drains, and backwater valves: control the path of water
2.1 Floor slope and drains
For a new room or heavy retrofit, target:
- Slope: 1–2% fall (10–20 mm per meter) from the perimeter toward one or two drains.
- Drain type: Trapped floor drains with removable grates and accessible cleanouts.
- Location: Under main wet areas: mixing tank zone, DWC strips, and any high-volume NFT manifolds.
If you cannot re-slope the slab, install local collection pans and trench drains under the key zones, all feeding a sump.
2.2 Backwater valves
If your drain connects to a sewer that can back up (common in older or combined systems), add a backwater valve on the line serving the grow room. In a worst-case sewer surge, the valve closes and keeps sewage from pushing through the floor drain into your room.
3. Secondary containment: size it to your largest reservoir
3.1 Room-level containment
Think of your grow room as a shallow tray:
- Perimeter curb: 50–100 mm high around room edges and at doors.
- Sealed transitions: Epoxy or welded vinyl up the wall at least 150 mm.
- Penetrations sealed: Pipe and cable penetrations sealed so water cannot drain into other rooms or wall cavities.
Containment volume rule of thumb: Your room should be able to hold the volume of the largest single reservoir or loop segment that can drain by gravity into the room, plus a buffer (25–50%). If your largest DWC reservoir holds 400 L, design for at least 500–600 L of containment before water reaches a doorway threshold.
3.2 Local pans and trays
Under each high-risk zone, add local containment:
- Poly or stainless pans under large reservoirs, nutrient mixing tanks, and fertigation skids.
- Long trays under NFT channels or vertical towers to catch drips and minor leaks.
- Low-profile spill pallets under drums or big Kratky totes.
Connect pans to a small drain line or a monitoring sump so that even if the main drain is clogged, the leak goes somewhere you control.
4. Leak sensors and auto shutoff: let electronics close the loop
4.1 Sensor strategy
Use at least three layers:
- Spot detectors: One under each reservoir, mixing tank, pump cluster, and RPZ assembly.
- Rope sensors: A loop around room perimeter, plus runs under main manifolds and along wall-mounted lines.
- Sump high-level sensor: A float or pressure sensor in your main collection sump.
4.2 Valve and pump logic
All leak signals should feed a control box that handles three main actions:
- Close water in: A normally-closed electric ball valve or solenoid downstream of the RPZ on your hydro feed. Power loss or alarm = valve closed.
- Stop pumps that can dump water: Nutrient feed pumps, top-off pumps, and any pumps sending water to elevated systems.
- Keep or start pumps that remove water: Sump pumps stay active so the system can clear the spill.
For a small room, a robust smart relay or industrial Wi-Fi controller is enough. Just make sure fail-safe behavior is built in: if the controller dies, the system should fail to a safe state, not continue with valves stuck open.

5. Sump redundancy: assume one pump fails on the worst day
5.1 Dual pump layout
Your main sump should be treated like your air pump in DWC: if it fails, everything is at risk. Set it up like this:
- Pump A (duty): Handles day-to-day drainage.
- Pump B (standby): Slightly higher float setpoint, kicks in if the water rises above normal.
- Two check valves: One on each discharge line to prevent water from flowing back through the idle pump.
- Separate circuits: Where possible, put each pump on a different breaker, or at least a separate outlet.
5.2 Controls and alarms
- Low-level float: Stops pumps from running dry.
- Normal high-level float: Starts Pump A.
- Emergency high-level float: Starts Pump B, sends an alarm, and can also signal your controller to lock out fresh water feeds.
Log run-time hours or install a simple run-time counter. If pump run time spikes or both pumps are running often, you either have a leak upstream or a drainage bottleneck.
6. Tailoring this to Kratky, DWC, and NFT
6.1 Kratky: low-pressure, not low-risk
Kratky setups feel harmless: static nutrient in jars, tubs, or totes, no pumps. But a cracked tote or kicked bucket can still dump tens of liters onto a floor.
- Keep Kratky containers inside trays or shelving with lip edges.
- If you plumb any auto-fill, use a small header tank with limited volume, not a direct connection to building pressure.
- Place leak sensors under the largest tubs and near door thresholds.
6.2 DWC and RDWC: bigger volumes, higher stakes
DWC and recirculating DWC systems can move hundreds of liters in minutes. Design them as if a bulkhead will eventually leak.
- Use quality bulkheads and unions, and keep as much plumbing as possible above the maximum water line.
- Integrate overflow standpipes that feed to safe drains instead of the floor.
- Run rope leak sensors under the full length of the system.
6.3 NFT and drip manifolds
NFT channels and drip systems rarely flood entire rooms by themselves, but a stuck solenoid or siphon can still cause damage.
- Mount channels over trays with drain lines to the sump.
- Use pressure regulators and limit the volume in elevated header tanks.
- Give each manifold an isolation valve so you can shut down one zone without killing the whole room.
7. Nutrient, pH, and EC management that supports resilience
All the flood-proofing in the world is wasted if a pH probe drifts and overdoses acid into your DWC loop. A climate-resilient room still needs disciplined nutrient control.
- Target pH: For most crops, 5.5–6.5. Greens and herbs often sit comfortably around 5.8–6.2.
- Target EC ranges: Roughly 1.0–1.8 mS/cm for leafy greens, 1.2–2.0 for many herbs, and 2.0–3.0 for heavy fruiting crops, adjusted for your cultivar and stage.
- Reservoir sizing: 2–5 L per mature plant in recirculating rigs is a practical starting point. Larger volumes buffer drift but increase the consequence of a spill, so balance stability against risk.
Use handheld meters for small rooms, inline probes with controllers for bigger systems, and always calibrate with fresh solutions on a schedule. If your automation ever sees obviously impossible readings, it should stop dosing and alarm, not keep chasing the number.

What to watch long-term: testing, documentation, and insurance
Once the hardware is in, the job is not finished. Flood-proofing is a maintenance habit.
1. Test intervals that actually catch problems
- RPZ backflow: Test yearly (or as required locally) and document the results.
- Leak sensors: Trigger each sensor quarterly with a damp cloth or a small splash, confirm that the alarm fires and valves close.
- Sump system: Lift each float, confirm each pump starts, check that the emergency float also closes water feeds if that is how you configured it.
- pH/EC probes: Calibrate at least monthly in small grows, weekly in commercial rooms.
2. Commissioning and failure drills
Before you trust a new build, run drills:
- Simulate a failed float by opening a top-off valve and confirm that containment and sensors respond.
- Block a drain (temporarily) and check how quickly water accumulates, and when alarms hit.
- Kill power to the controller to confirm valves fail closed and the room does not keep filling.
3. Documentation that makes insurers and inspectors relax
Insurers hate unknowns. Inspectors hate undocumented cross-connections. You can calm both by keeping:
- A simple diagram showing water supply, RPZ location, drains, sumps, and shutoffs.
- A binder or digital folder with RPZ test records, pump maintenance logs, and probe calibration logs.
- Photos of secondary containment, curbs, and backwater valves.
When you can prove that a single failure will not flood a neighboring tenant or contaminate drinking water, it is much easier to get coverage and pass inspections.
4. Retrofitting vs building new
If you are already running a room, start with the highest leverage upgrades:
- Add a normally-closed shutoff on your hydro feed and tie it to at least one leak sensor.
- Drop your largest reservoirs into pans or spill pallets sized for their full volume.
- Install rope leak sensors and a basic alarm before you tackle floor slope or major drain work.
For new builds, bake everything in from day one: RPZ and air gaps, sloped floors, curbs, dual sumps, and sensor-driven shutdown. It is cheaper to do once than to retrofit after your first flood.
Climate volatility is not going away. Outdoor farmers are already adapting their layouts and business models after repeated storm losses, as highlighted in this case study. Indoor growers have a different set of tools, but the same mandate: design for failure, then keep growing through it.
As an Amazon Associate, I earn from qualifying purchases.