Hydroponic Microgreens Indoors (2026): Exact PPFD/DLI, EC/pH, Seeding Density & Food‑Safe SOPs for 7–14‑Day Harvests
1. Common mistakes that wreck fast microgreen cycles
“More light, more nutrients, more seed” is still the unofficial microgreens playbook for a lot of new hydro growers. It is also why so many trays stall at 5 cm tall, fall over from damping‑off, or turn slimy in the cold room.
In 7–14 days you do not get many chances to fix mistakes. Your PPFD, DLI, EC, pH, seeding density, and sanitation either land inside a fairly tight window, or you pay for it in yield and shelf life.
Local indoor farms like the team behind Local Leaf’s hydroponic microgreens operation have shown how controllable these crops can be when the whole cycle is dialled in from seeding to cold‑chain delivery, handling everything on site from germination through packing and local distribution as noted in this news piece. But most home and small commercial growers are still fighting the same avoidable issues:
- Leggy, weak stands under mismatched PPFD and DLI.
- Burnt cotyledons from running lettuce‑strength EC on baby tissue.
- Patchy germination because media and humidity are off.
- Mold flare‑ups and short shelf life from poor tray and room sanitation.
- Trays that are hard to clean or irrigate evenly.
This guide strips the guesswork out of hydroponic microgreens. You will get working PPFD and DLI bands by growth stage, EC and pH targets, seeding densities by crop type, plus concrete SOPs for shallow recirculating trays, sanitation, and HACCP‑aligned harvesting and packaging.
We will focus on fast, indoor 7–14‑day cycles for brassicas, radish, pea, sunflower, and common herb microgreens grown in shallow hydro setups (Kratky trays, flood tables, or recirculating film).

2. Why these mistakes keep showing up (and the real targets you should run)
2.1 Light: PPFD and DLI bands that actually work for microgreens
Most growers either starve microgreens for light under “houseplant” LEDs, or they cook cotyledons with high‑intensity fixtures meant for fruiting crops. Because we are harvesting young tissue, you do not need flowering‑level PPFD, but you do need enough photons to build dense, stocky stands.
Microgreens respond best to a specific DLI (daily light integral) range, not just a random PPFD number. Here is a practical target band for indoor microgreens under white or full‑spectrum LEDs:
- Germination / blackout (days 0–2, sometimes 3): Near‑darkness or very low PPFD (<50 µmol·m⁻²·s⁻¹). The priority is moisture and uniform germination, not photosynthesis.
- Early photosynthetic stage (days 2–4): 120–180 µmol·m⁻²·s⁻¹, 16 hours, giving roughly 7–10 mol·m⁻²·day⁻¹ DLI.
- Main growth (days 4–harvest): 180–260 µmol·m⁻²·s⁻¹, 16–18 hours, giving about 10–16 mol·m⁻²·day⁻¹.
Translated to a practical recipe for common crops:
- Brassicas (broccoli, kale, mustard, cabbage microgreens): 10–15 mol·m⁻²·day⁻¹ DLI, PPFD typically 180–230 µmol at 16 hours.
- Radish: 10–16 mol·m⁻²·day⁻¹. These tolerate slightly higher intensity without quality issues.
- Pea shoots: 10–16 mol·m⁻²·day⁻¹. Peas handle higher PPFD but will still lodge if DLI is low and stems stretch.
- Sunflower: 12–18 mol·m⁻²·day⁻¹, target PPFD 220–280 µmol at 18 hours for thick stems.
- Herb microgreens (basil, cilantro): 8–14 mol·m⁻²·day⁻¹. Running them at the lower end can improve color and limit stress, while higher DLI gives more mass if temperature, water, and nutrients are on point.
For the math‑inclined, DLI is:
DLI (mol·m⁻²·day⁻¹) = PPFD (µmol·m⁻²·s⁻¹) × hours × 3600 / 1,000,000
Example: 220 µmol for 16 hours → 220 × 16 × 3600 / 1e6 ≈ 12.7 mol·m⁻²·day⁻¹.
Use a PAR meter or mapping from your LED manufacturer, like the dynamic control strategies covered in this LED article, to make sure your real canopy PPFD matches your setpoints. Rack systems tend to creep much higher at the top shelves if you do not verify.
2.2 Nutrient strength and pH: microgreens are not baby lettuce
A lot of hydro growers simply pour their lettuce recipe into microgreen trays. That often means EC in the 1.6–2.2 mS/cm range on day‑old seedlings. Results: burnt tips, slow growth, and uneven stands.
Microgreens have a short cycle and relatively low nutrient demand. They benefit more from a stable, moderate solution than from aggressive feeding.
- Working pH window (all systems): 5.8–6.2 target, acceptable 5.5–6.5.
- Germination EC (days 0–2): 0.3–0.7 mS/cm. Many growers germinate on near‑zero EC and shift after cotyledons open; a gentle 0.4–0.6 is a good compromise.
- Growth EC (days 2–harvest):
- Brassicas: 0.8–1.2 mS/cm.
- Radish: 1.0–1.4 mS/cm.
- Pea shoots: 1.2–1.8 mS/cm.
- Sunflower: 1.2–1.8 mS/cm.
- Basil, cilantro: 0.8–1.3 mS/cm.
Rather than chasing small EC changes every few hours, focus on:
- Pre‑mixing nutrient solution to the right EC and pH.
- Maintaining solution temperature between 18–22 °C to stabilize uptake and pH drift.
- Logging pH and EC once per day for every reservoir, or per batch in static Kratky trays.
General hydroponic nutrient management practices, including keeping nutrient ratios balanced and avoiding the overuse of additives, are covered well in broader hydroponics resources like this method overview, and they apply directly to microgreens in shallow systems.
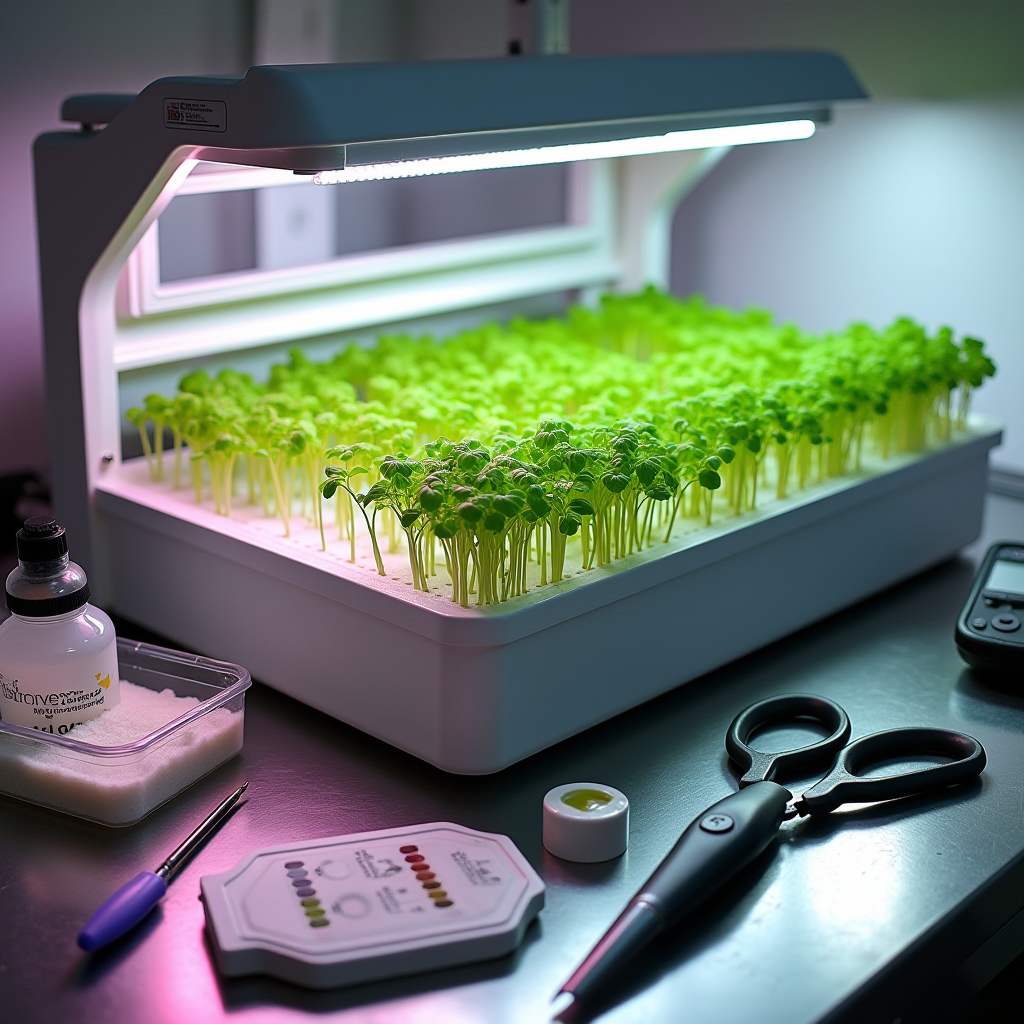
2.3 Tray design: where seeding density, humidity, and airflow collide
Microgreens are shallow‑rooted, high‑density crops. Tray design controls how evenly they hydrate and how quickly the canopy dries after irrigation. Get this wrong and you will either fight chronic dry corners or permanently soggy zones that invite Pythium and other damping‑off pathogens.
A good microgreen tray system does three things:
- Delivers uniform moisture across the media.
- Lets free water drain or recede quickly after irrigation.
- Uses food‑grade, smooth materials that are fast to sanitize.
Standard internal dimensions are around 10×20 inches (25×50 cm). For hydroponic use, you want both:
- Solid trays for bottom watering / flood‑and‑drain or Kratky style.
- Perforated inserts that sit above the solution and support your media.
Recirculating shallow tables or channels, like a scaled‑down NFT layout, work well when you build in a slight slope (1–2%) to avoid pooling and keep roots oxygenated, similar to the water‑efficient layouts discussed in this water‑saving systems article.
2.4 Seeding density: approximate gram‑per‑tray targets
“Wall‑to‑wall green” is not the correct target. Stems need a little space to dry out between irrigations. Over‑seeding is one of the fastest ways to create a mold problem, even when your nutrients and pH are perfect.
Use these starting densities for a standard 10×20 in tray. Adjust 10–20% based on your specific seed lot and target height.
- Broccoli / kale / cabbage / kohlrabi / mustards: 8–15 g per tray.
- Radish: 20–30 g per tray.
- Pea shoots: 100–150 g per tray (pre‑soaked).
- Sunflower: 50–80 g per tray (pre‑soaked and rinsed).
- Basil: 6–10 g per tray.
- Cilantro: 12–20 g per tray (whole seed or split depending on supplier).
If you see any of these symptoms, reduce density by 10–20% on the next run:
- Persistent moisture trapped in the canopy after lights come on.
- White fuzz at the base of stems that does not look like new rootlets.
- Stems lodging because there is literally nowhere for them to lean.

3. How to fix your hydro microgreen system step by step
3.1 Pick the right shallow hydro system for 7–14‑day crops
Microgreens can be grown in several hydro layouts, but for repeatable 7–14‑day harvests indoors, you want something that lets you flip trays quickly, keep roots oxygenated, and sanitize hard surfaces between cycles.
Option 1: Recirculating shallow tray (recommended for scaling)
- Flat or slightly sloped tray (1–2% grade) draining back to a central reservoir.
- Trays lined with hydro mats or perforated inserts carrying thin media.
- Top‑feed (spray line) or ebb‑and‑flow irrigation on a timer.
Why it works: You can tightly control EC, pH, and solution temperature at a central reservoir, similar in principle to the water‑saving recirculating systems highlighted in this Grozine feature. You also get consistent moisture across many trays with minimal hand labor.
Option 2: Kratky‑style static trays
- Solid 10×20 tray filled with 1–3 cm of nutrient solution.
- Perforated insert or floating mat above the solution; roots grow down.
Pros: Extremely simple, no plumbing or pumps. Great for small home or R&D racks.
Cons: Each tray is its own reservoir, so pH and EC drift independently. Oxygen drops as the crop matures, and biofilm builds faster. For food‑sale operations, this increases sanitation workload because every tray is a separate tank to drain, clean, and refill between batches.
Option 3: DWC rafts or deep channels
DWC shines for head lettuce and large leafy greens, but for microgreens the depth is mostly wasted. Harvest logistics are harder (cutting directly off rafts), and cleaning the rafts on a 7–14‑day cycle is tedious. Unless you already have a DWC line and want to test microgreens on it, shallow trays will be more efficient.
3.2 Exact seeding, blackout, and lighting SOP
Use this as a base SOP for most brassica and radish microgreens. Adjust timing for peas, sunflower, and herbs.
Step 1: Tray prep (day 0)
- Wash and sanitize trays and inserts (see section 3.5).
- Lay your chosen media: hemp, jute, coir mat, or 1–2 cm of fine substrate.
- Pre‑wet the media with nutrient solution at EC 0.4–0.6 mS/cm, pH 5.8–6.2, until uniformly moist but not floating.
Step 2: Seed evenly
- Weigh seed to the target density (for example 12 g broccoli or 25 g radish per 10×20 tray).
- Broadcast evenly by hand or with a shaker; you should see seed nearly touching but not stacked.
- Lightly mist the surface to settle seed into contact with the media; do not wash it into clumps.
Step 3: Blackout / germination (days 0–2 or 3)
- Stack or cover trays with a clean lid or another tray. Apply gentle weight (1–2 kg) to encourage even rooting for peas and sunflower; very light or no weight for delicate herbs.
- Keep in a warm zone at 20–24 °C with high local humidity. You can run the room slightly cooler but avoid big swings.
- Check once per day. If the media surface is drying, mist lightly with low‑EC solution.
Step 4: Move to light
- When most seeds have sprouted and hypocotyls are 1–3 cm long, unstack and move trays under lights.
- Start at PPFD 120–180 µmol·m⁻²·s⁻¹ for 16 hours.
- Increase to 180–260 µmol over the next 1–2 days if the crop looks strong, aiming for 10–15 mol·m⁻²·day⁻¹ DLI.
3.3 Irrigation and nutrient management SOP
Recirculating trays
- Maintain reservoir EC and pH within your target band (for example 1.0 mS/cm, pH 5.9 for brassicas).
- Run short, frequent cycles for top‑feed or ebb‑and‑flow: often 1–3 minutes every 2–4 hours during the light period, with little or no irrigation in the dark unless media dries out.
- Aim for trays that are fully moist after irrigation but visibly drying at the surface by the next cycle.
- Change or fully refresh the reservoir every 3–5 days or between batches to limit microbial buildup, consistent with the sustainable recirculation practices discussed in this hydroponics data article.
Kratky trays
- Fill trays to a depth of 1–3 cm with nutrient at germination EC and pH.
- Do not top up constantly; let roots chase the solution down. If levels fall too fast, you are under‑filling or running too warm and dry.
- Because there is no aeration, room temperature and DLI must be moderate to avoid oxygen crashes in the solution.
- Dump, clean, and refill every cycle (after each harvest).
pH and EC adjustment
- Use a reliable pH and EC meter. Calibrate at least weekly, as is standard practice in professional hydroponics labs and greenhouses.
- For pH down, food‑grade phosphoric acid is common. For pH up, potassium‑based products work well.
- Make small changes, 0.1–0.2 pH units at a time, and mix thoroughly before re‑testing.
- If EC is rising, top up with plain water. If EC is falling, top up with slightly stronger nutrient solution to bring the tank back into range.
3.4 7–14‑day harvest timing by crop
Under the light and nutrient bands above, a typical indoor schedule at 20–22 °C air temperature looks like this:
- Brassicas (broccoli, kale, mustard):
- Days 0–2: blackout.
- Days 2–6: under lights, building canopy.
- Harvest: days 7–10 when cotyledons are broad and true leaves just appear.
- Radish:
- Days 0–2: blackout.
- Days 2–5: main growth.
- Harvest: days 6–8 for tender stems, or up to day 10 for more mass.
- Pea shoots:
- Days 0–3: blackout with light weight.
- Days 3–10+: strong light.
- Harvest: days 10–14 at 10–15 cm height, tendrils formed.
- Sunflower:
- Days 0–3: blackout with weight.
- Days 3–9+: main growth.
- Harvest: days 9–12 when most seed hulls have dropped and cotyledons are flat.
- Basil and cilantro:
- Days 0–3: blackout (lighter cover for basil).
- Days 3–10+: under moderate DLI.
- Harvest: days 10–18 depending on height and flavor goals.
To keep operations lean, choose fixed sowing days (for example Monday and Thursday). That tightens labor and sanitation cycles, similar to how Local Leaf run all their seeding, germination, harvesting, and packing under one roof for a predictable local supply, as noted in this hydroponic microgreens feature.
3.5 Food‑safe sanitation SOP for trays and equipment
Hydroponic microgreens combine warm water, nutrients, high humidity, and dense plant tissue. That is a great environment for plants and for unwanted microbes. To keep the food‑safety risk low, you need a repeatable sanitation program aligned with HACCP thinking: prevent, not chase.
Tray and contact surface cleaning
Run this full cycle between every batch:
- Pre‑scrape: Remove media mats and plant residue. Do not compost inside the grow room.
- Detergent wash: Use hot water and a food‑safe detergent. Scrub all surfaces, especially corners and lips.
- Rinse: Rinse with clean water to remove detergents.
- Sanitize: Apply a no‑rinse food‑grade sanitizer at the manufacturer’s labeled rate (peracetic acid and chlorine solutions are common choices in hydroponics facilities).
- Dry: Air‑dry in a clean, low‑dust area before stacking or re‑use.
Reservoirs, pumps, and lines
- Drain reservoirs between batches or at least every 3–5 days.
- Scrub internal surfaces and sanitize like trays.
- Run sanitizer solution through pumps and irrigation lines, then flush with clean water.
Room and environmental hygiene
- Clean floors and drains with detergent and sanitizer on a fixed schedule.
- Wipe down benches, shelving, and high‑touch surfaces daily.
- Service fans and filters regularly to limit dust and spores circulating through the canopy.
Worker hygiene
- Hand‑wash protocols at entry to the grow and pack rooms.
- Clean gloves and simple protective clothing (aprons, hair nets, beard covers where needed).
- No eating or drinking in production areas.
- Clear policy for excluding sick staff from harvest and packing.

4. What to watch long‑term: HACCP‑aligned packaging and performance benchmarks
4.1 Build a simple HACCP‑style flow for microgreens
You do not need a 100‑page manual to bring HACCP logic into a small microgreens room. Start with a one‑page flow from seed receipt to customer hand‑off and mark your hazards and controls.
A typical microgreens HACCP‑aligned flow looks like this:
- Input control: Verify seed suppliers, request pathogen testing certificates where available, and store seed cool and dry.
- Water control: Define your water source and treatment. If you use municipal water, periodic verification of quality plus in‑house filtration is often enough. If using well water, include periodic microbial and chemical testing in your plan.
- Sanitized equipment and room: Run the tray and room SOPs from section 3.5, logged per batch.
- Production monitoring: Daily logs for pH, EC, solution temperature, and room temperature/RH. Note any unusual odors, slime, or crop symptoms.
- Harvest hygiene: Clean, sanitized knives or scissors; gloves; dedicated harvest tables; product kept off the floor.
- Cooling and packaging: Rapid move to 1–4 °C after cutting, then packing into clean, food‑grade containers.
- Cold‑chain maintenance: Refrigerated storage and delivery, with basic temperature checks.
- Traceability: Batch codes tying each package back to seed lot, seed date, harvest date, and pack date.
Each of these stages can host Critical Control Points (CCPs) or pre‑requisite programs depending on your regulatory environment. For instance, some operators treat water quality and sanitizer concentration as CCPs, while room cleaning sits in an SSOP (sanitation standard operating procedure) that supports the HACCP plan.
4.2 Packaging that protects shelf life and food safety
Microgreens do not ship like head lettuce. They have a high surface area and a thin cut edge, so they respire and dehydrate quickly. Good packaging and cold‑chain discipline will often double your usable shelf life compared with loose clamshells tossed in a warm fridge.
For small commercial and serious home operations, aim for:
- Containers: Rigid food‑grade clamshells or lidded trays with small vents, or high‑quality food‑grade bags rated for refrigerated produce.
- Fill level: Enough volume that leaves are not crushed, but not so much headspace that product slides around and bruises.
- Labeling: Product name, variety if relevant, batch/lot, packed date, “Keep Refrigerated” statement, and use‑by or best‑by date based on your in‑house trials.
- Temperature: Keep at 1–4 °C from post‑harvest through delivery. Avoid freeze damage below 0 °C.
Do simple shelf‑life tests in your own fridge: hold back a few clamshells from each batch, log the date, and check color, aroma, and texture daily until you would no longer serve them. That real data should drive your labeled shelf life, not a guess.
4.3 Performance benchmarks for a dialled‑in microgreen room
Once your system stabilizes, use these benchmarks to evaluate whether PPFD, DLI, EC, pH, and hygiene are doing their job.
- Stand uniformity: >90% of trays with full coverage and no obvious thin patches or lodged sections.
- Cycle time: Brassicas and radish consistently ready between 7–10 days with less than ±1 day variance tray to tray at the same sow date.
- Yield: As a rough target, many operations pull 0.3–0.6 kg of finished microgreens per 10×20 tray for brassicas and radish at commercial densities; peas and sunflower can run higher.
- Shelf life: 7–10 days of acceptable quality at 1–4 °C for brassicas and radish, slightly shorter for sunflower, often longer for peas and some herbs.
- Water and nutrient use: Recirculating systems should turn over several crops before significant plumbing replacement is needed, while still allowing for reservoir dump and cleaning every few days to manage bio‑loads, echoing the water‑efficiency and recirculation strategies discussed in this water‑saving hydroponics guide.
4.4 Continuous improvement: nudging PPFD, DLI, EC, and density
Once you are inside the “good” band, do not stop testing. Microgreens respond quickly to small nudges. Keep change logs and tweak only one variable at a time:
- Increase DLI by 2–3 mol·m⁻²·day⁻¹ for one variety and log any change in stem thickness and color.
- Try a 0.2–0.3 mS/cm EC bump on peas and sunflower in one reservoir for a single cycle.
- Adjust seeding density in 10% steps up or down and record lodging, mold pressure, and yield.
This is how a small room evolves into a reliable local supply like the microgreen operations highlighted in Grozine’s news coverage: clear parameters, tight SOPs, and slow, deliberate tuning instead of chasing every bad tray with a completely new recipe.

As an Amazon Associate, I earn from qualifying purchases.